Friday, September 10, 2010

Old gold..


Hello!


Today in class we covered evening make up, which consisted mainly of a dark smokey eye with black coal liner and false lashes. There was no theory in this class we just went straight into the practical work. My model was blonde so I went for a dark brown lid smoked out with a charcoal grey colour in the crease. I also applied individual lashes flared on the edge of the eye to add some drama to the look. I didn’t use black shades as it would have been too severe on fair hair. I was happy with how my look turned out and so was my model :)

Today I am going to talk about my first pigment I ever got from MAC


M.A.C - Old Gold

The first time I got my make-up done in MAC this is the colour the mua used on me and I loved it so much I bought it. Whenever I show this pigment to anyone they always ask for me to use it on them.

It is so unique, gold is a great shade for majority of people but this particular shade has a variety of different colours in it. When you first look at it, it has the obvious gold hue off it but when the light shines on it or your when you foil it on the lid it has a greeny hue off it too! It is so gorgeous!


Top swatch - Applied wet
Bottom swatch - Applied dry


When applied dry it can be applied all over the lid and in the crease as I find that when it is put in the crease I don’t know why but it turns brown in the crease. It almost creates its own shadow.

I noticed this in a video Lauren luke [love her! :)] has when she used this particular pigment in on her youtube channel! I shall link the video here so you can see what I mean! A good example of this is 1:40 seconds in, pause it and have a quick look!

http://www.youtube.com/watch?v=5JcIWKg_8bY

When applying pigment as it is loose shadow it always needs a base of some kind for it to adhere to on the skin. When applying pigment I always start off with a standard eye primer.  (such as UD Primer potion)

When using the pigment wet I just apply it straight over the UDPP. When using it dry I tend to first apply the UDPP, then a black eyeliner all over the area I will be applying the pigment too, blend it out with a brush and then pat the pigment on top.

I find when applying pigments the best brush to use is a synthetic fibre brush as these tend to absorb less of the pigment when the pigment is in a damp state. But whatever you wish to use is up to you!

Old Gold is part of the permanent pigment line in MAC and is available in all MAC store. Pigments cost approx €22 which is expensive but they last forever as they contain so much product also they have a variety of different uses. So you are getting value for your money! :)

-Buttons x


I am not affiliated with MAC in any way. This product was purchased with my own money and these are my honest thoughts on the product :)

Managing my mop of hair..

Hello!

My internet was on the blink last night so excuse the lateness of this post!

So to fill in on today class, we covered trend make up. This consists of the current trends for the current season i.e Autumn/Winter 2010. Current big trends at present include the dark structured brow and strong lips in red and plum shades. We had to choose an image from A/W and recreate it. I chose to do Lady Gaga’s cover look for the September issue of Vanity Fair. I was really happy with how it turned out :)

Now to move onto my post of the day!

I have curly hair so I tend to use my hairdryer and ghd quite frequently to keep my naturally frizzy mop under control! All this heat from styling tools such as the ghd and blow drying can be really damaging to the hair so I like to use a heat protector when styling to protect my hair. My favourite product is the ghd heat protectant


The packaging is super cute, it is Barbie pink! It is usually a gold colour I think but this particular bottle is in aid of the Maire Keating Foundation for Breast Cancer so the bottle is pink. This product has a light scent which is not overpowering and fades pretty quickly.

I tend to apply this product to my hair when damp before I blowdry with my hair with the dryer. If straightening or curling my hair when dry I then apply this product misting each section, allowing each section to dry before applying the hair tool.

I like this heat protectant as it doesn’t make my hair sticky or take away from the natural texture of the hair when styled. It lasts a long time and does a super job protecting my hair. I think this is my forth or fifth bottle so far and I love it! Two thumbs up for me!

It can be purchased in salons only I believe. My local Peter Marks salon stocks it but I am sure anywhere that sells ghd’s will sell it too! I can’t remember how much it costs as i have this bottle quite a while but I will check it out! :)

-Buttons x 


I am not affiliated with this company in any way. I purchased this product with my own money and these are my honest thoughts on the product :)

Tuesday, September 7, 2010

Naked!... pallet of course! ;)

Hello!

So I finally got my mits on the Urban Decay Naked pallet :)


I have been using it every day since I got it and I absolutely love it! If you are mainly a neutrals girl like myself, this is right up your alley!

The pallet comes with 12 different shadows ranging between matts and shimmers. It also contains a dual ended eyeliner in the infamous black liner 'zero' and 'whiskey' a chocolate brown liner. To top it all off it also comes with a mini primer potion.


The colours range from a pale flesh tone colour to a dark black with varying shades of gold, silver, brown and pink inbetween.

I really love this pallet, the colours are super pigmented even without using the primer potion and they all blend really easily between eachother no matter what shade you use.

[L>R] Virgin, Sin, Naked, Sidecar, Buck, Halfbaked.
[L>R] Smog, Darkhorse, Toasted, Hustle, Creep, Gunmetal.

My favourite look so far has been wearing 'half baked' on the lid, 'naked' and 'buck' in the crease, 'Darkhorse' in the outer corner of the crease and 'virgin' as a highlight on the browbone and on the tearduct. Also lining my waterline with 'whiskey' - Love it!

Here are some swatches of the colours in the same order as they are in the pallet below:

[L>R] Virgin, Sin, Naked, Sidecar, Buck, Half-baked, Smog, Darkhorse, Toasted, Hustle, Creep & Gunmetal.
Eyeliner [L>R] Zero, Whiskey

Really have nothing bad to say about this pallet at all! It gets the full two thumbs up from me. The packaging is gorgeous (there has been a lot of issues with UD packaging in the past but they got this one bang on) really luxurious and neat. Make up artists all over the world will appriciate this pallet. I can see it being used as a nice bridal pallet maybe?

The pallet costs €37 and is available from all Urban decay counters now. (For all those students out there, if you purchase it from a boots store you can use your student travelcard and get 10% off! Reducing the cost to €32 = nice discount!) It has been selling out but I believe it is going to be a permanent addition to the range (I could be wrong I will try to find this out officially!) So everyone should be able to get a hold of this baby at some point in the near future without having to fork out $75 on ebay (its been sighted on there for that much..shocking I know!)

Happy Hunting everyone! :)

-Buttons x

I am not affiliated with Urban Decay in any way. This post was written by my own will and the pallet discussed above was purchased by me with my own money. These are my honest thoughts and opinions on the product :)

Monday, September 6, 2010

Hairdryer love!

Hello!

The weather has been shocking here the last few days with monsoon like rain, its not quite working out with my straightened hair :(

Oh well despite this I have been enjoying my new hair dryer which has cut down my blowdry from like 20mins to 13mins long :o Fyi I have long curly hair which I always blow dry straight when I wash it as it it unmanageable otherwise and 13mins is record time for me!

So with that I introduce you all to the 'Turbo Stratos 3800"


It comes with a super long lead and plug (obviously haha) It also contains two different nozzles, a small one and a larger wider one.


The lengthy lead is a brilliant addition as I find most hair tools leads are wayy too short which can make styling different, however that is not the case with this one! The box doesn't come with that many instructions or details (such as the exact length of the lead or smaller details like that) but I suppose a hair dryers function is pretty self explanatory right?

The dryer itself has three different buttons on the handle;

  • A black power button which has three different levels - off, medium pressure and full pressure
  • A red heat button which also has three different levels - off, warm and hot.
  • Finally it also has a cool air button which is the blue one. This clicks on and off.
-

I really like the additional feature of having the cool air button with a click button as with my last hair dryer, when using the cool air feature you just had to hold down the button when using it. With this dryer you can click it on and off. Fab! 

I have always bought my hairdryers from my hairdressers as they have always lasted years and worked the best. This one is no exception, I had my last hairdryer ten years and I expect I will get that long out of this one too!

This dryer was available in a rainbow of colours but I chose the black as I felt it looked sleek and I am not a huge fan of coloured tools as they can look very cheap!

Overall I really like this dryer it dried my hair super fast, it gave my hair a lovely shine and it handled really well when I used it! I would totally recommend it to anyone! :)

I bought mine from my local Peter Marks salon and I think it cost €47 :)

-Buttons x
I am not affiliated with this product in any way. I purchased this product with my own money and these are my honest thoughts on the product :)

Sunday, September 5, 2010

MAC Venomous Villains Collection for Disney :D

Hello!


So I don't know about anyone else but I am SUPER excited for this collection! It's combining two of my favourite things.. MAC and Disney! :D


The collection looks brilliant they have taken four great villains; Cruella De Vil, The Evil Queen from Snow White, Maleficent from Sleeping Beauty and Dr Facilier from The Princess and the Frog. Although I personally would have included Ursula from TLM they are still great choices! :)


I have my eye on eyeshadows mostly but there is also some gorgeous lip colours! The packaging looks great too I really won't wish to depot anything haha!


The Temptalia website has been my MAC bible for a long time and they provided all the information for this collection online (I will link further down to their synopsis of the collection because it is fabulous!) 


The main products I am lusting after for this collection is....well basically all of it!


But to be more realistic the products I intend on purchasing (if they are nice colours in person!) are:


Most of the eyeshadows from the Cruella De Vil line, Evil Queen line and Maleficent line, The light pink lipstick from the Cruella line and the purple pigment from the Dr Facilier line :)


My poor laser card is in for a beating...good thing I have been saving up for this for a while, I knew I would love this collection when it was announced!

The collection is due for release in late september! I have found from past collections that MAC tend to release collections in BT Grafton on a Thursday. Also that it tends to be released a few days before America! Hope this helps any anxious shoppers! :)

-Buttons x


The information above came from the Temptalia website. I do not own or claim to composed the information myself. I have just quoted the website. Full credit for the information above goes to  http://www.temptalia.com/mac-venomous-villains-collection-for-fall-2010 :)

Thursday, September 2, 2010

Bronze bronze bronzer!

Hello!

So today in class we covered contemporary bridal looks. Our tutor did two demos, one of a dramatic dark smokey eye with a nude lip and then 20s pin up bridal look with winged black liner and a bold red lip. There was no theory in todays class just practical which was a nice change. My partner did the smokey eyed look on me with a red lip, she chose aspects from both looks to practice on me while I chose to practice my winged liner and statement red lip. I was very happy with how it turned out! :)

Since starting my make-up course I have become a little obsessed with contouring. Now that I know how to do it correctly and where to place it on the face, I havnt stopped! haha!

Both my sister and my mother love bronzer and their favourite is MAC's bronzer in 'Golden'


This is what I have been using on my face and I love it! The packaging is nice and simple with a compact mirror in the lid. This is super handy! I wish the natural msf's came with a mirror as, I use this as my facepowder and always have to go root out a mirror when I am not at home with the mirror on the wall on front of me.

I like to use an angled blush brush such as the MAC 168 (I believe it is) or the Sigma equivalent to apply with, as I find they fit in the hollows of the cheek with their sharp angle fabulously!


The colour is dark enough to give a bronzed shadow effect but without being orange! It has become a staple in my make up bag now!


MAC usually release this shade as part of collections which means you can usually pick one up with some funky packaging, if the black is a little boring for you! My sister picked this packaging up maybe a year or two ago I cannot remember when exactly it was released but I believe it was part of the neo sci-fi collection! I kept the empty compact because I just love the packaging! Isn't it cool?


If you looking for a bronzer to experiment with contouring or even just a new bronzer I would recommend giving this one a try! :)

-Buttons x

I am not affiliated with MAC in any way, I bought this product with my own money and these are my honest thoughts and opinions on the above product! :)

Wednesday, September 1, 2010

Pretty Petticoat!

Hello!

To start off I thought I would fill you in on what we covered in my make up course today.


First our tutor introduced us to all the different face shapes and how to achieve the desired 'oval' face shapewith contouring no matter what shape your face is! We then looked at different eye shapes and how to achieve the best shaped look for any eye shape, for example how to make a mature eye shape look its best! Our tutor then did a demo on an asian girl in our class to demonstrate how to create a socket with an oriental eye shape. It was super interesting and informative! We then paired off and worked on eachother practicing contouring and eye shapes! Tomorrow night is a contempory look with a red lip I believe so I will keep you posted on how that turns out :)

Now onto tonights post!

I know this post is a little late coming but I love this product so much I really didnt want to neglect it just because I am late haha!


I have been a long time lurker in the beauty community both here on blogs, livejournal and on youtube and because of this I was very familiar with the hype surrounding MSF's (or Mineralise skinfinish to you and me) I got sucked into the craze that was for the infamous 'Stereo Rose' msf. I wanted it. hail. rain. or snow!

When I discovered it was going to be re-released Iwas estatic! I noted the day of release here in Ireland and flew into MAC with my mum who was curious about these infamous msf's too after listening to me ramble on about them and from reading about them in magazines.

When I got into MAC I ran straight to the counter and thankfully they had them all in stock so I started swatching away and to my surprise 'Stereo Rose' when I swatched it on my skin wasnt my cup of tea at all. It looked too orange against my skin tone (ghostly white haha)

I was super disappointed for only a monent as, as soon as I saw petticoat I fell in love! (I fall in love with products wayyy too often I know..stay with me haha)

It was more pinky based and suited my skin gorgeously, I also really liked 'by candlelight' but only wanted to buy one as I  had convinced myself I didnt need two :( so I chose Petticoat and love it!


My only qualm with msf's, is that you must apply them with a light hand as they are tricky to blend out but aside from that they are gorgeous! They leave a lovely flush of colour on the skin with a hint of shimmer matched to the shade of the msf itself (not just a shiny effect if you get me). I have found Petticoat is even more gorgeous with a tan as it shows up the shade with more vibrancy.

All in all if you can track these babys down, they are worth the hype. Hopefully MAC will repromote them soon as I believe they sold out especially in the states within the day of launching! :)

-Buttons x

Tuesday, August 31, 2010

The scent of the beach in a bottle..

Hello!

Todays post is going to be about my all time favourite perfume, 'Malaia' by Hollister.

It's the most gorgeous scent in the world, every person I know who has smelled this perfume (both male and female) thinks it is gorgeous I have never met a person who doesnt like it. When I smell it, it makes me think of the beach specifically an american beach. I have no idea why it just does, It is also super girly and fresh.

I have no knowledge in the field of describing scents correctly so I will insert the descripition given on the Hollister website here

"Malaia is the natural beauty of a sundrenched Hollister girl. The essence of crisp water, sheer florals, and soft woody tones. The allure of the ocean and the California sun"I have been wearing this scent for years and have gone through many, many bottles of Malaia. The only downside to this fragrance is that it can only be purchased from a Hollister store. They will not ship fragrances overseas which is lame.

But for those of us in Ireland and the Uk, there is a store in Belfast and 2 stores (I believe) in England so even if you don't have a friend travelling to the US in the near future it is stll possible to track down a bottle!

The packaging is simple and cool. It has a pinky floral pattern printed on a cardboard tube with an image of a pretty beachy looking all american girl on the side. The bottle itself is really simple, clear glass with hollister printed on the glass in a raised font. It also has a silver atomiser cap on the top.

It is available in 2 size bottles 1fl oz or 2fl oz. The larger one comes with an atomiser which is a gorgeous touch to the fragrance and looks super pretty when on your dresser. The smaller size is perfect for your handbag as it is small and neat.

The fragrances retail for $30 for the 1Fl oz (€24 approx) and $38 for the 2Fl oz bottle (€30 approx)

I will continue to wear this scent for as long as it is available and next I am looking to try the 'So Cal' fragrance by Hollister and 'Jake' the fragrance for men by Hollister. I doubt I will be disappointed! :)

-Buttons x

I am in no way affiliated with Hollister, this fragrance was gifted to me by a friend for my birthday. These are my honest thoughts and opinions on the fragrance.

Monday, August 30, 2010

Skin care - it's simple! haha..

Hello!
I have finally caught up with my backlog of posts that were long overdue! I will try my best not to let that happen again :)

Today I am going to talk about skincare..

I know its been drilled into all of us since we were children to wash our face before bed and then when we get up in the morning before leaving the house to do the same. It's always been a chore and even after hitting 20 nothing has changed it's still a chore!

For some reason when I hit 20 my skin suddenly started to break out, I am still undecided whether it was to do with the new face powder I was using at the time or whether it was a hormonal thing. Either way I had to change my skincare routine as it was not clearing up.

My old routine consisted of  a facewipe to clean my make up off at night and one in the morning followed by moisturiser. This has since changed and has made the world of difference! Anyone who knows me or reads my blog will know I have super sensitive skin and simple is the only range I have tried so far that doesnt irritate my skin.


I now use a foaming face wash in the morning followed by a toner (I cannot use toner everyday as it can be too drying on my skin) and then a light moisturiser. Then at night I repeat the regime swopping the cleansing facewash for a cleansing lotion.
I will list the products below now with their full names for anyone interested;
  • Simple softening facial cleansing mousse
  • Simple kind to skin purifying cleansing lotion
  • Simple kind to skin soothng facial toner
  • Simple kind to skin hydrating light moisturiser

Switching to this new regime has improved my skin ten fold, I am now back to just getting the occasional spot every so often! I can't speak hightly enough for the simple range and would recommend anyone with sensitive skin to try it out! :)

-Buttons x

I am not affiliated with Simple in any way. These products were bought by me with my own money. These are my honest thoughts and experiences with the products mentioned.

Juicy gloss!

Hello!

I have been going on a bit of a lipgloss frenzy at the moment slightly abandoning lipstick as the weather hasnt been windy which is perfect for glossy lips haha!

I have been using a Lancome juicy tubes set I got as a gift from a friend a while ago. These gift sets contain mini tubes of product which are ideal for testing out new colours for a more economical price!


My set contained 4 juicy tubes in a range of colours..


I will insert individual swatches below of the 4 Juicy tubes..
[L->R]
Plum freeze, Glacier, Ablaze, Magic Spell


I really like Juicy tubes they are my favourite squeezy lipglosses. They are not sticky or gloopy they just give a nice shine on the lips solo or over a lipstick and there is a huuuge range to choose from with regards to colours. They are really pigmented as you can see from the swatches above.

The sets usually go on sale at christmas time on counters and imo are really worth it if you are looking to try new colours or even just looking to expand your kit. They last a long time on the lips after application and I find them really moisturising.

My current favourite is the blue one 'Glacier' however my favourites swop around all the time! I would really recommend you give them a try! :)

-Buttons x

I am not affiliated with Lancome in any way. The products mentioned above were gifted to me by a friend. These are my honest thoughts and opinions on the product.

Mushroom Polish!

Hello!

Although this polish had its debut in an earlier post, I feel that after the ordeal I went through to track it down it deserves its own post haha!

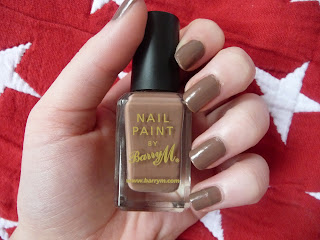
It is the coveted Autumn colour.. Barry M nail paint in number 310 - Mushroom :D


This baby sent me on a bit of a wild goose chase around Dublin trying to track it down after trying 6 (yes you read that right 6 different Boots!!) I finally located their last bottle in store in the Jervis street branch!

It is everything I thought it would be and more.. gorgeous!!


The formulation is as nice as my other Barry M paints - thick and creamy, however I find that a second coat is not as necessary with this shade as it is pretty opaque after one coat. Maybe this is common to their darker shades, I dont know as this is my first dark shade by them.

All in all, big thumbs up for me! I have found my new autumn love! :)

-Buttons x

(I am not affiliated with this company in any way. I paid for this product with my own money. The views expressed above are my honest thoughts and opinions on the product.)

Catch up from Class

Hello!

So for this post since I never got to fill you in on count of my busy week last week, I thought I would bring you all up to speed on what I learned in class last wed nesday and thursday!

Wed nesday
So Wednesday was a bridal class introducing us to everything to do with bridal make up. From the trial etiquette to what a wedding day mua would undergo. Our teacher was lovely, she was full of fantastic tips on how to get your business as a bridal mua started and tips for the day itself. She drew us up a timetable and schedule on how to organize the day. She then gave us her top products for bridal make up. Next she did a demo of a natural bridal look including how to apply individual lashes. We then were paired up and had to give the look a go ourself which was very sucessful all around. She also gave us loads of hygiene tips for different products such as lipstick and eye liners / pencils.

Thursday
Thursdays class was focused on colour theory and colour correction. We first looked at the colour wheel and discussed primary, secondary and complementary colours for the eyes. The different shades that will bring out the natural colour of your eye and make them pop! Next the teacher introduced us to colour correction - how to correct red toned skin, bruises, birthmarks and more! Was very intresting and very useful! After the theory part of the class, our tutor did a demo on colour correction on the face and then how to choose a shade to make your clients eye colour pop! We then paired off and had a go ourselves. Was brilliant, I really enjoyed the class! Next week is eye/face shapes and a contempory bridal look!

Can't wait! If anyone has any questions feel free to ask! :)

-Buttons x

Friday, August 27, 2010

Fashion Haul

Hello!

Okay so I have been seriously MIA this week from blogging but it has been the busiest few days I have had all summer. I'm back now and ill catch up with all my posts for the week so the blog doesn't suffer!

So for this post I have a little shoes haul from New look..

Its coming into Fall / Winter now and that means serious rain here in Ireland, so I have started to stock up on water proof shoes as I don't think my summer flip flops are going to cut it anymore..haha

First up is a pair of flat boots


They are a very neutral colour which go well with jeans for running in and out of college!
The heel is small and wide so it is super easy to walk in. I really wanted some nice shoes to wear with my macs and dressier jackets because I don't think they look well when paired with converse!

Next up is a slightly dressier shoe which I spotted as a great high street dupe of a Fall / Winter essential


As you can see it a high heeled boot with a fluffy trim around the cuff. I am in love with them and I am just waiting for an opportunity to wear them out! They are really easy to walk in, very stable and very trendy for this coming season!

-Buttons x


(All items mentioned were paid for with my own money and I am not affiliated with the company in any way)

Wednesday, August 25, 2010

Simple Smoothing Facial Scrub - Mondays post

Hello!


Apologies for my absence from blogging over the last day or two, I had my driving test yesterday and was totally focused on passing it. Im back now and happy to report I passed! :D


Now to catch up on my posts!


For this post I am going to talk about my favourite facial exfoliator, Simple's 'Smoothing facial scrub'.


Here is the little blurb off the simple website describing the product

"Reveal brighter, more even textured skin with our Kind To Skin Smoothing Facial Scrub.
Vitamin E moisturises and improves skin condition
Rice granules are a gentle natural exfoliator
pH balanced so works in harmony with your skin"

I have very sensitive skin and this is the perfect light exfoliant for my skin. My face feels smoother and refreshed after using this product, I love it!

The small grains that do the exfoliating are very soft and tiny and are not harsh against my skin, they feel very natural. Can't say enough good things about this product, its super! :)

Image from: http://www.simple.co.uk/products/kind+to+skin+smoothing+facial+scrub-75ml-45.aspx
I am not affiliated with simple in any way these are just my thoughts on the product and the product was paid for with my own money.

-Buttons x

Friday, August 20, 2010

Squeaky clean brushes!

Hello!

Happy Friday everyone!

When applying my make-up I always use brushes and as a results have a mountain to clean at the end of the day. Now that I am doing my course, I have another full set of brushes to clean at night too so I have gained a bit of knowledge on what products work the best and thought I would share with you some tips I have learned.

Firstly there are two different ways to clean your brushes. There is 'spot cleaning' and 'deep cleaning' your brushes.

  • Spot cleaning is used when you need to clean and sanitize your brushes quickly to reuse them with a different product or shade of a product. This can be done as often as desired!


  • Deep cleaning is used to wash your brushes at the end of the day to completely remove all traces of make-up from them and also to sanitize them. This too can be done as often as desired however it is recommend to be done at a minimum of once a week.

(I will do a blog soon explaining these different processes in more detail!)

When cleaning my brushes I like to use something that totally destroys bacteria as I am terrified of spreading spots and other skin problems around the face and other peoples faces for that matter!

I currently am using a combination of these three products; MAC brush cleanser, Johnsons baby shampoo and surgical spirits.


When spot cleaning I like to use the MAC brush cleanser on my own personal brushes as it is alcohol based that dries very quickly, which means the brushes can be used again fast! It retails at about €20 a pop which can be a little expensive so I try to go easy on it. 

Surgical spirits is also fabulous for spot cleaning on the go as it is super sterile and because of the high alcohol content dries instantly which is ideal when working on a client. It can be bought quite cheaply for approx €4.75 and when decanted into a small spray bottle it works brilliantly at dispensing a fine mist.

Finally an old cheap reliable that I use is Johnsons Baby shampoo. It is suitable for baby's hair which is perfect for make-up brushes hair as they can be easily damaged if used with harsh products. This is available in all supermarkets and chemists in the baby aisle for less then €3 depending on the size of the bottle you wish to buy.

Hope this was helpful! :)

-Buttons x


Thursdays post - Best Body Butter !

Hello!

Super sorry for the late thursday post! I only got home from my class at 10:30pm and was up for the rest of the night trying to do the online module registration for my college course so I had zilch time to do a post!

So as a quick fill in on what we covered in my make-up class tonight, we recapped on how to prep the skin for make-up (cleanse, tone, moisturise) then we recapped on how to choose foundation to match a clients skin. Next we watched a demo of how to make someone up with soft smokey eyes and strip lashes. We also used cream products tonight instead of powder for blush and contouring. I really enjoyed the class, I was delighted with how my models look turned out. My tutor was delighted with it too and I stuck to the time limit so happy days!  Next class is bridal looks!

Now onto the blog post!

I have always had super sensitive skin, it runs in my family! So I am always hesitant about trying new products especially body products. But the Body Shop's 'Body Butters' have always appealed to me, so a while ago I took the plunge and purchased their body butter in 'shea'.


Firstly the smell is delicious, its quite light but lingers on the skin for the whole day. The packaging is so cute it is a creamy colour tub with an image of presumably the shea seed which the butter is extracted from

I purchased the small 50ml or 1.75oz tub just to see if I liked it and to see if it reacted with my skin which I am happy to report that it did not! I have been using it over the last few months and zero signs of irritation!


It is super moisturising and leaves my skin really soft. The smell is so delicious, I keep smelling my arm throughout the day haha!

Over all I would recommend this product 100% I totally love it and will continue to repurchase!

Also the Body Shop do a sort of 'Back to mac' with their tubs of body butter, where if you bring back 5 empty tubs you get one free...love it!

The small tub I purchased cost approx €8 and I believe the huge tubs cost about €15, I will confirm this asap! :)

-Buttons x


Wednesday, August 18, 2010

Surprising lip gloss

Hello!

So first up I have some super exciting news (well for me anyway..hehe) Tonight I had my first class training to be a professional make up artist!! It was soo much fun and I have learned loads already. Any tips or tricks I learn I will of course share here on my blog, so hopefully I will have loads of little tips appearing here in the coming weeks! :)

Tonight we started with skin prepping; Different skin types, how to recognise them and how to prep them for make up application. Then we started on foundation matching and little on contouring and blush. Anywhoo thats enough of that for tonight, onto the post!


Miss Sporty has never been a brand that appealed to me, the stand in Boots is always a mess with messy wet product all over the rails and stand itself.

During my fresher week in college last year, we received 'goodie bags' which contained loads of college necessities such as pot noodle, a bottle opener and a pen.

However right in the bottom of the bag was a small squeezy tube of Miss Sporty lip gloss which upon arriving home I tossed into my make up bag and never looked it until recently.

Swatch ( excuse the lighting I will take a better shot tomorrow)


It is called 'Miss Sporty fabulous sorbet delicious wet look lip gloss' and I actually love it!
The colour I received is in '005 Iris'. It is a bubble gum pink colour in the tube and when applied it is more of a clear colour with a pink tint. It also has blue undertones which make teeth look whiter - always a plus factor!

I really like it, however one thing that has to be noted is that it has a really fruity taste which imo is delicious however it might not be for all. Definitely needs to be tested!

This product is also super moisturising which lasts even after the gloss has faded off. I like wearing this on its own or on top of lipsticks for a glossy sheen. I particularly love it over Viva Glam Gaga, really makes it pop!
I would definitely recommend it and to top it all off I believe it costs less then a fiver - no excuse not always have one on hand!

-Buttons x

Tuesday, August 17, 2010

MAC Haul

Small MAC Haul


Hello!

I have recently acquired some new MAC items so I thought I would share with some swatches.

I have three products to discuss so I will get started!

Blush - 'Pink Swoon'

First up is a sheertone blush, called 'Pink Swoon'. It is a bright bubblegum pink that is lovely and vibrant against my pale skin. However I blend it out well when I wear it during the day as it can build up to be quite intense! This is my favourite MAC blush I have tried so far - gorgeous!
E/s in 'Contrast'

Next up is an eyeshadow called 'contrast'. I think it is a very smokey, dark navy blue in the packaging however when swatched and applied to the skin it comes out a very dark almost back with a navy blue iridescent sheen. Its really pretty on the skin as it is not quite as harsh as say 'carbon' for doing a smokey eye, I have been using it as a crease colour and am really enjoying it!

E/s in 'Dazzelight'

Last up is an eyeshadow called 'Dazzelight'. It is a veluxe pearl finish. I would describe it as a shimmery champagne colour with pink-ish undertones. This is my favourite eyeshadow to use as a highlight colour under the brow bone or on the lid or even on the cheekbone. I tend to wear very neutral colours during the day and most have a gold-ish tone to them so this always blends perfectly with them. This has to be my fifth or sixth of this eyeshadow!

Thats all for now but im sure there will be more soon I can never stay away from MAC for too long..haha

-Buttons x

Mondays post - Inspired nails


Hello!
Just a quick monday post.

Feeling very inspired from lusting after the new YSL nail polish duos on the internet,

I decided to combine a few colours of my own..all Barry M nail paints

(From left) Pure Turquoise - 295,  Berry I/c - 308,  Mushroom - 310.


Horrific paint job I know but I choose to just look at the colour combinations on the nail not the actual skill applied haha.


The lilac is in shade 'Berry -308', the turquoise is in 'Pure Turquoise -295 ' and the brown is  (Yes I finally tracked it down!!) 'Mushroom - 310' :)

-Buttons x

Friday, August 13, 2010

Flawless Concealer

Hello!

So in light of the recent additions to my brush family I have gone on a bit of a spree trying them all out one by one.

First up is the concealer brush, the Sigma F70


A long time ago when I was first getting into using make up brushes, I stole a concealer brush from a set my sister received as a present to try out using one.

It was a synthetic brush which is generally considered perfect for applying creamy products however, I found the brush didnt blend the concealer into my skin and abandoned using it.

I felt it was just spreading the product rather than blending it in. (I believe it was a Victoria Jackson brush for reference)

However this has not been the case for the Sigma brush, it does a fabulous job applying the product and covering any imperfections using minimum product!

The bristles are synthetic but not as 'plastic' as the Victoria Jackson brush was, they are softer which I think is key to the ease of blending it gives on application.

I am delighted with it and it has revolutionized my relationship with concealer as it gives a far more professional and flawless finish.

Using my trusty fingertips is no longer an option..(well except for rushy days when time is of the essence!)

-Buttons x

Thursday, August 12, 2010

Super Sleek!

Hello!

A while back I read online via blogs and Youtube gurus about the Sleek pallets exclusively available in the UK, of course upon hearing about such exclusivity naturally I wanted and had to have one.

So on a recent trip up to Belfast I made it my business to locate a Superdrug and pick up a pallet.

Which after many minutes rushing around Belfast city centre in the lashing rain with the family in tow I found a Superdrug and much to my delight they had loads of my much desired pallets.

I picked up the Sleek Storm pallet to try out and decided if I liked it I would pick up more on my next.visit.


To begin with the packaging is lovely. It is very professional, smart and sleek as the name suggests.

When opened it contains a large mirror and twelve shadows which when swatched with a finger tip are highly pigmented.


Teal (2nd row, 3rd one in from left)
Gold (1st row, 3rd in from right)
Burgandy (1st row, 1st in from right) 


This was a day or two prior to my 20th birthday party which I had my make up done in MAC for as part of my lovely boyfriends present.

To my despair on the day my makeup ran quite bad around my eyes as unfortunatly the MUA got some of the duo lash glue in my eyes by accident and my sensitive eyes never quite recovered.

None of my MAC eyeshadows would cover the areas of skin that had gotten wet from my teary eyes however the Sleek pallet stepped in and saved the day.

The shadows covered all the affected areas of skin and stayed put fabulously. I bowed down to the sleek pallet from then on!

My only issue with the pallet is the texture of the shadows, they are super soft which is brilliant for blending but not so good for keeping them in the pallet.. (yes black eyeshadow I am looking at you..) that has caused me a few stresses.

The shadows being so soft and crumbly I find a bit messy and upon opening the pallet it has crumbled out onto the carpet in my room marking the carpet.

This has caused me to not reach for the pallet as much purely for that reason. I wouldnt recommend this pallet as one to carry around for fear of it destroying a bag or anything fabric as upon taking the pictures for this blogpost it has once again destroyed the carpet. :(

But as a product to use purely at home (over the sink perhaps :/ I would highly recommend.

It wasnt too expensive around €8-12 I think it cost me, I will try to confirm the price.

Unfortunatly I do not intend purchasing anymore of Sleeks pallets for my kit as I would be too afraid to take this with me to someones home or studio for fear of it staining something belong to them which is a shame as I do enjoy using the shadows  :(

-Buttons x

(This pallet was purchased with my own money and I am in no way affiliated with Sleek. These are my honest thoughts and opinions on the product.)

Wednesday, August 11, 2010

Concealer camouflage!

Hello!

Like many other women around Ireland and the UK, when those coveted Benefit editions of Glamour magazines came out recently I flocked to my local shop to track one..or maybe a few..copies down.


Firstly I managed to grab the copy containing the 'it stick' which to be quite honest was the one I was least bothered about picking up. Silly me.

My quest then took me to town, to a small easons - my trusty source and it didnt let me down. I picked up both the 'eye-bright stick' and 'Bad Gal liner'.

Surprisingly the one I was least bothered about has been my favourite product to use over the last few weeks, I have not touched the other two products!


'It stick'

My MAC select moisture cover concealer ran out so I resorted to my 'it stick' in despiration one morning and I found love!

For reference in MAC foundation I am a NC15 or C1 (as in Cullen family pale..I kid you not..haha) and as a result find it difficult to find a concealer that is brighter then my foundation to lighten the area under my eyes but the 'it stick' does a fantastic job!

It blends seamlessly with my foundation with only a light pat and does a wonderful job concealing dark circles under my eyes.

It has a lovely creamy texture and applies very smoothly to the skin with precise application as a result of the pencil like shape.


Swatch on my twilight pale hand haha

It is the only concealer I have come across that I can apply when I am not wearing foundation at all, that blends into my skin flawlessly for those days when my only venture outside is to the local garage to pick up milk or something for my parents.

Would really recommend everyone to try it out especially people as fair skinned as me :)

-Buttons x

Tuesday, August 10, 2010

Lashes Galore!


'Maybelline  - The Colossal Volum' Express Mascara' 

Hello!

When applying my makeup one of my favourite parts of the process is doing my lashes. 

If my mascara is applied nicely then I end up usually happy with my make up, I don't know why I just do!

So with that comes an obsession with mascara and false lashes!  

Over the last few years I have tried loadsss of different mascaras, both high end and drug store.

Just a few that were close to hand..

My favourite that all the women in the household always come back to and love to bits, is 'Maybelline  - The Colossal Volum' Express Mascara'


Maybelline claim that it:

  • Creates 9X the volume, instantly.
  • Patened MegaBrush + Collagen Formula plump lashes one by one
  • Dramatic Volume with no clumps
  • Washable

I have to agree with that

Okay it doesn't give you the lashes as shown in the advertisement but it does do a fabulous job!

It gives my lashes lift, separation, volume and length which lasts for the whole day. 

I don't find that it crumbles all down my face by late afternoon (unlike some..yes I am looking at you rimmel) or give me lovely panda eyes!

It removes really easily with make up remover after one or two swipes.

Queue awkward photo of my eye..haha

Although my lashes are naturally quite long and dark, I can really see the difference this mascara makes.

It makes my lashes so long they tip off my eyebrows and blackens them gorgeously! 

My sister and mother both swear by it too and it has become a firm family favourite.

Love it and would totally recommend it! :)

-Buttons x


Source of quote and image: http://www.maybelline.com/Product/Eye/Mascara/the-colossal-volum-express.htm